
🔬 Lab5: Messages#
ROS msgs#
msg#
ROS utilizes a simplified message description language to describe data values that ROS nodes publish. There are a lot of built-in messages that are widely used by ROS packages (common_msgs). The geometry_msgs package is one example of a pre-built message which provides the Twist message type used to drive the robot in the previous ICE.
Custom messages#
If a pre-built message type does not meet the needs of a system, custom messages can be created. A custom message is created using a .msg file, a simple text file that descries the fields of a ROS message. The catkin_make tool uses the message file to generate source code for messages. The .msg files are stored in the msg directory of a package. There are two parts to a .msg file: fields and constants. Fields are the data that is sent inside of the message. Constants define useful values that can be used to interpret those fields. We will primarily use fields.
Fields#
Each field consists of a type and a name, separated by a space per line. The field types you can use are:
int8, int16, int64 (plus uint*)
float32, float64
string
time, duration
other msg files
variable length array[] and fixed-length array[X].
Header#
The header contains a timestamp and coordinate frame information that are commonly used in ROS. You will frequently see the first line in a .msg file have a header.
Format#
Header header
fieldtype fieldname
For example, if we created a custom message file titled Person.msg that describes a person it might look like this:
Header header
string firstname
string lastname
int32 age
Importing messages#
To utilize a msg in a node it must first be imported into the script.
    from geometry_msgs.msg import Twist
    from ice5.msg import Person
⌨️ Syntax:
from <package>.msg import msg
Using messages#
After importing the msg you can access the fields similar to any object. For example, if we created an instance variable to store our Person message:
person = Person()
You would then access the fields using the field names of the msg:
print("%s %s is %d years old!" % (person.firstname, person.lastname, person.age))
If you wanted to set the linear x and angular z speeds of a Twist message before publishing it to the TurtleBot3 you would again use the field names provided by the pre-built message. If you googled the Twist message (Twist Message, you would see the contents of the Twist message include two other messages, linear and angular, of type Vector3:
geometry_msgs/Vector3 linear
geometry_msgs/Vector3 angular
Each of those two messages include the same fields and fieldnames:
float64 x
float64 y
float64 z
To set the linear x and angular z values, we have to access those fields using an objected oriented method. For example:
    from gemoetry_msgs.msg import Twist

    # create a publisher to send Twist messages over the cmd_vel topic
    pub = rospy.Publisher('cmd_vel', Twist, queue_size = 1)

    # set the Twist message to drive the robot straight at 0.25 m/s
    bot_cmd = Twist()
    bot_cmd.linear.x = 0.25  # notice you have to access both the "linear" & "x" fields of the Twist message
    bot_cmd.angular.z = 0.0

    # publish the Twist message
    pub.publish(bot_cmd)
In-Class Exercise 5#
In this exercise you will create a custom message that describes a person. This message will provide two strings, first and last name, and an integer age for a person. We will then create a node that publishes information about that person and a node that subscribes to that information.
Create the custom message:#
In a new terminal on the Master, create an ice5 package which depends on the std_msgs package and rospy package, compile and source the ws:
cd ~/master_ws/src/ece387_master_spring2024-USERNAME/master
catkin_create_pkg ice5 std_msgs rospy
cd ~/master_ws
catkin_make
source ~/.bashrc
Change directory to the package folder and create a msg directory:
roscd ice5
mkdir msg
cd msg
Create the msg file for the Person and add the fields previously discussed (header, firstname, lastname, and age):
nano Person.msgSave and exit:
ctrl+s,ctrl+x
Write the Publisher#
Create the file for the publisher:
roscd ice5/src
touch ice5_publisher.py
Copy the below code to the
ice5_publisher.pyfile and fill in the required lines (look for the TODO tag). You can edit via the terminal using nano, but it is often easier to use a GUI editor. Browse to the publisher in the file browser and double-click. This will open the file in thonny (if it is open in any other editor, stop, raise your hand, and get help from an instructor)
#!/usr/bin/env python3
import rospy
from ice5.msg import Person # import the message: from PKG.msg import MSG

class Talker:
    """Class that publishes basic information about person"""
    def __init__(self, first = "Cadet", last = "Snuffy", age = 21):
        self.msg = Person()         # creates a Person message
        self.msg.firstname = first  # assign the firstname field
        self.msg.lastname = last    # assign the lastname field
        self.msg.age = age          # assign the age field

        # TODO: create the publisher that publishes Person messages over the person topic
        # Since we don't care about losing messages we can set the queue size to 1
        self.pub =

        # TODO: create a timer that will call the callback_publish() function every .1 seconds (10 Hz)
        rospy.Timer()

        # nicely handle shutdown (ctrl+c)
        self.ctrl_c = False
        rospy.on_shutdown(self.shutdownhook)

    def callback_publish(self, event):
        if not self.ctrl_c:
            # TODO: publish the msg


    def shutdownhook(self):
        print("Shutting down publisher.")
        self.ctrl_c = True

if __name__ == '__main__':
    rospy.init_node('talker')

    # create an instance of the Talker class changing the class variables
    Talker("Steven", "Beyer", 33)
    rospy.spin()	# run forever until ctrl+c
Save and exit.
Make the node executable.
Write the Subscriber#
Create the file for the subscriber:
touch ice5_subscriber.pyCopy the below code to the
ice5_subscriber.pyfile and fill in the required lines (look for the TODO tag).
#!/usr/bin/env python3
import rospy
from ice5.msg import Person # import the message: from PKG.msg import MSG

class Listener:
    """Listener class that prints information about person"""
    def __init__(self):
    	# TODO: create the subscriber that receives Person messages over the person topic
    	# and calls the callback_person() function.


        # nicely handle shutdown (Ctrl+c)
        rospy.on_shutdown(self.shutdownhook)

    def callback_person(self, person):
    	# TODO: print the information about the person


    def shutdownhook(self):
    	print("Shutting down subscriber.")

if __name__ == '__main__':
    rospy.init_node('listener')
    # create an instance of the class
    Listener()
    # keeps python from exiting until this node is stopped
    rospy.spin()
Save and exit.
Make the node executable.
Requirements to use custom messages.#
There are a number of settings that have to be set within the package.xml and CMakeLists.txt files that tell catkin to compile the messages.
package.xml#
Edit
package.xml(rosed ice5 package.xml) and uncomment these two lines (remove arrows on both sides of the line):<build_depend>message_generation</build_depend> <exec_depend>message_runtime</exec_depend>
Save and exit.
CMakeLists.txt#
Edit
CMakeLists.txt(rosed ice5 CMakeLists.txt) and make the following changes:Add the
message_generationdependency to thefind_packagecall so that you can generate messages:# Do not just add this to your CMakeLists.txt, modify the existing text to # add message_generation before the closing parenthesis find_package(catkin REQUIRED COMPONENTS rospy std_msgs message_generation )
Find the following block of code:
## Generate messages in the 'msg' folder
# add_message_files(
#    FILES
#    Message1.msg
#    Message2.msg
#)
and uncomment by removing the
#symbols and then replace theMessage*.msgfiles with your.msgfile, such that it looks like this:add_message_files( FILES Person.msg )
Find the following block of code:
# generate_messages(
#    DEPENDENCIES
#    std_msgs
#)
and uncomment so it looks like:
generate_messages(
    DEPENDENCIES
    std_msgs
)
Uncomment and add the
message_runtimedependency to theCATKIN_DEPENDSline in thecatkin_package()function near the bottom without changing anything else:catkin_package( ... CATKIN_DEPENDS rospy std_msgs message_runtime ... )
Save and exit.
Run roscore!
The
rospytool can measure certain statistics for every topic connection. We can visualize this inrqt_graph, but we have to enable it afterroscore, but before any nodes. In a new terminal run the following to enable statistics:rosparam set enable_statistics true
Lab8: Custom Messages#
Synopsis#
This lab will provide practice in creating custom messages. You will use provided code that listens for events from the mouse. Specifically, the code is listening to the position of the cursor, and any buttons pressed. You will create a custom message that is going to pass the cursor position and mouse button events across the /mouse_info topic. You will develop a controller that will subscribe to the /mouse_info topic and then publish a Twist message to /cmd_vel according to the requirements in the lab handout.
Lab Objectives:#
In this lab, we will be building upon everything we have learned in the first 5 modules of the course. We are going add functionality to use basic code that I have created to:
Read the mouse position
Detect button or scroll wheel events from the mouse
Send custom message to controller
The Controller will then scale a Twist message on the
\cmd_veltopic to drive the robot
In short, we are going to use the mouse to drive the robot. Moving the mouse cursor up or down on the screen will drive the robot forward and backward. Moving the mouse cursor side to side on the screen will cause the robot to turn left or right. There should also be a dead zone within +/- .25 of the center of the screen where no movement will occur The code template that I have provided for the mouse client depends on a couple of different libraries. We are going to use the python installer (pip) to install two libraries, pyautogui and pynput.
dfec@master:∼$ pip install pyautogui
dfec@master:∼$ pip install pynput
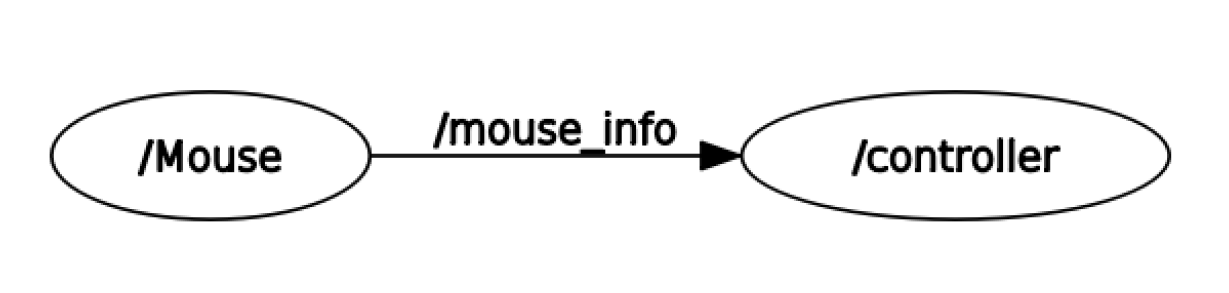
Essentially the code you are going to create will develop the following graph. This graph below does not have the robot nodes on it, so you won’t see the /cmd_vel topic active. However, you will either need to use the turtlebot simulation or your actual robot to prove that the code is working. Part of your lab report will require you to show the complete graph.
Mouse Node:#
The Mouse node will be created by the mouse_client_OO.py code. The framework for this code is provided here. Look for the TODO sections to see where you need to edit the code. The Mouse node will primarily detect mouse position and events and publish a custom MouseController message that you will create in a lab1 package within the master folder of your repo.
Controller Node:#
The controller node is created by the turtlebot_controller.py code. I have also provided the framework for this code here. The controller node will subscribe to the /mouse_info topic and publish a Twist message to the /cmd_vel topic
Your Custom MouseController Message.#
Your MouseController message needs to have precisely the following 4 fields in it:
Header
status (of type
std_msgs/Bool)xPos (of type float32)
yPos (of type float32)
You will need to use the procedure highlighted in ICE5 to create this custom message. Notice that the second field in the messages above is a message from the std_msgs group in ROS. Remember, this is an acceptable field based on what you learned in Module05. If you want to get more familiar with the Bool
message, you can use the built in ROS functionality to see what the format of this message will be:
dfec@master:∼$ rosmsg info std_msgs/Bool
Additional Requirements.#
Your code must adhere to the following additional requirements:
All code and message files should be stored in a package within the master folder called lab1.
The controller will only be activated by scrolling down with the mouse (on the center scroll wheel)
The controller will be immediately deactivated by scrolling up with the mouse.
If the controller is deactivated, the robot will stop all movement, until an override by another module.
You don’t need to handle the override at this point, but your controller code should be organized and flexible enough that it can handle additional capability in the future.
Report.#
Complete a short 2-3 page report that utilizes the format and answers the questions within the report template. The report template and an example report can be found within the Team under Resources/Lab Template.
Turn-in Requirements#
[25 points] Demonstration of mouse control of Turtlebot (preferably in person, but can be recorded and posted to Teams under the Lab1 channel).
[50 points] Report via Gradescope.
[25 points] Code/ROS package: push your code to your repository. Also, include a screenshot or the raw text of the turtlebot_controller.py and mouse_client_OO.py files at the end of your report.
rosidl_default_generators is a package in ROS 2 that provides the necessary tools to generate code for interfaces such as messages, services, and actions from their definitions. It is part of the build process for generating the corresponding C++ and Python code from .msg (message), .srv (service), and .action (action) files that are specified in your ROS 2 package.
In your specific example, the rosidl_generate_interfaces macro is used to generate these code bindings. Here’s a breakdown of what happens:
rosidl_generate_interfaces(${PROJECT_NAME} ...): This command tells the ROS 2 build system to generate the necessary code (C++, Python, etc.) from the message (.msg) and service (.srv) definitions listed within the command. The${PROJECT_NAME}is a placeholder for your package name, which should be defined elsewhere in your CMake configuration.The
DEPENDENCIESkeyword: This specifies any external packages that your messages or services depend on. In this case, you are saying that theSphere.msgmessage depends on thegeometry_msgspackage.What
rosidl_default_generatorsdoes:It generates code for the types defined in
.msgand.srvfiles.It includes all necessary build dependencies and processes to ensure that the interface definitions are available and usable by the rest of your ROS 2 code.
It works with different languages (like C++, Python, etc.) so that your interface files can be used across multiple programming environments.
In essence, rosidl_default_generators is what allows ROS 2 to take your custom interface definitions (messages and services) and turn them into usable code in your ROS 2 project.
rosidl stands for ROS Interface Definition Language in the context of rosidl_default_generators.
ROS: Refers to the Robot Operating System, the framework and middleware for building robotic applications.
IDL: Stands for Interface Definition Language, which is a language used to define the structure of data types and interfaces, such as messages, services, and actions, in a way that can be understood and used across different programming languages and platforms.
In the case of rosidl_default_generators, the package is responsible for generating code from interface definitions written in .msg, .srv, and .action files. These files define the structure of messages and services, and rosidl provides the tools and processes to transform these definitions into usable code in ROS 2 (like C++ and Python).
So, rosidl is essentially the part of the ROS 2 build system that handles the generation of interfaces and code bindings based on these interface definitions.