
🔬 Lab5: Driving the Robot#
📌 Objectives#
Students should be able to remotely access and control the TurtleBot3 robot using SSH.
Students should be able to configure and verify ROS communication between the Master computer and the TurtleBot3.
Students should be able to launch and analyze ROS nodes and topics using ROS diagnostic tools.
Students should be able to use pre-built ROS packages to drive the TurtleBot3.
📝 Overview#
In this lab, you will learn how to interact with a remote robot via SSH and use ROS tools to communicate with and control a TurtleBot3. You will work with pre-built ROS packages, such as turtlebot3_bringup and turtlebot3_teleop, to establish and analyze communication between different ROS components. Additionally, you will use the gamepad node from the previous lab to control the robot, reinforcing your understanding of ROS topics, nodes, and message exchange.
💻 Lab Procedure#
Working with a Remote Machine#
The Raspberry Pi on your robot acts as a Wi-Fi access point (AP), allowing direct communication between your Master computer and the robot without requiring an external network. Since the TurtleBot3 does not have a dedicated monitor and keyboard, you will connect to it remotely using SSH. This will allow you to run ROS nodes and send commands from your Master computer.
Connect to the Robot’s Wi-Fi Network
Click the system menu (top-right corner of the screen).
Select Wi-Fi Networks and choose
RobotX, whereXis your assigned robot number.
Check Connectivity
Open a terminal on your Master computer and run:
$ ping 192.168.50.1
If the connection is successful, you will see responses from the robot’s IP address.
If you don’t receive a response, check that you are connected to the correct Wi-Fi network.
Establish an SSH Connection
Access the robot remotely by running:
$ ssh pi@192.168.50.1
⌨️ Syntax:
ssh <username>@<hostname/IP address>When prompted, enter the default password (provided by your instructor).
Once connected, any commands entered in this terminal will execute on the robot.
Change Your Password (First-Time Setup)
To secure your connection, update the password:
$ passwdFollow the prompts to enter and confirm your new password. If successful, you will see the message:
password updated successfully
Test the new password by opening a new terminal and reconnecting to the robot via SSH.
Submit this password on Gradescope so instructors can update your robot’s software configuration.
Edit the
.bashrcFileOpen the file for editing:
$ nano ~/.bashrc
Ensure the following lines are at the bottom of the file:
source /opt/ros/humble/setup.bash
source ~/robot_ws/install/setup.bash
source /usr/share/colcon_cd/function/colcon_cd.sh
export ROS_DOMAIN_ID=0  # For master0 and robot0
export _colcon_cd_root=/opt/ros/humble/
export TURTLEBOT3_MODEL=burger
export LDS_MODEL=LDS-02  # Replace with LDS-02 if using new LIDAR
source /usr/share/colcon_argcomplete/hook/colcon-argcomplete.bash
Update
ROS_DOMAIN_ID=X, whereXmatches theXinRobot Xon your robot.Our class robots have two different LIDAR variants: LDS-01 and LDS-02 (shown below).
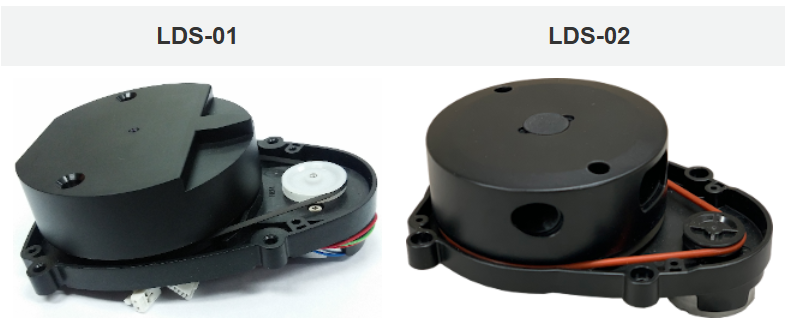
If you have the LDS-01, change
export LDS_MODEL=LDS-02toexport LDS_MODEL=LDS-01in your.bashrcfile.Save your changes and exit the editor.
Close the SSH Connection
To disconnect from the robot, type:
$ exit
This will return you to your Master computer’s terminal.
Connecting Remote Machine with Host Name#
You can also connect using the machine’s hostname rather than its IP address
Warning
Ensure you execute the commands in this section on the Master computer. Do not execute them on the Raspberry Pi.
Check Connectivity Using Hostname
$ ping robotXX
Replace
robotXXwith your specific robot number.Reconnect Using Hostname Instead of IP
$ ssh pi@robotXX
⌨️ Syntax:
ssh <username>@<hostname>
Setting Up Password-Free SSH Authentication#
Using password-free SSH authentication improves both security and convenience. Instead of manually entering a password each time, SSH keys provide a more secure and automated way to log in. This also makes remote access faster and more efficient.
Generate an SSH Key Pair on the Client:
Open a terminal on the client (
Master) machine and run the following command to generate an RSA key pair:
$ ssh-keygen -t rsa -b 4096
When prompted to enter a file to save the key, press Enter to accept the default location (
~/.ssh/id_rsa).If prompted for a passphrase, leave it empty (just press Enter) to enable password-free login.
Copy the Public Key to the Remote Server:
Transfer your public key to the server by running the following command, replacing
usernameandhostnamewith your actual credentials:
$ ssh-copy-id username@hostname
If prompted, enter your password for the remote machine. After this, the key will be added to the server’s authorized keys.
Test the Connection: Now, try logging into the remote machine without a password:
$ ssh username@hostname
If everything is set up correctly, you should log in without being prompted for a password.
Driving the Robot with Keyboard#
Using SSH, launch the
robot.launch.pyfile on the robot:Tip
Use tab completion to make your life easier! Start typing a package name or node, then press Tab to auto-complete the command.
Note: The following command contains a deliberate typo to prevent copying and pasting. Be sure to type it out manually or use Tab for auto-completion:
$ ros2 launch turt1ebot3_bringup robot.launch.py
⌨️ Syntax:
ros2 launch <package> <launchfile>You should see something like this:
[turtlebot3_ros-3] [INFO] [1738299487.825470539] [turtlebot3_node]: Succeeded to create battery state publisher
[turtlebot3_ros-3] [INFO] [1738299487.829476168] [turtlebot3_node]: Succeeded to create imu publisher
[turtlebot3_ros-3] [INFO] [1738299487.841928335] [turtlebot3_node]: Succeeded to create sensor state publisher
[turtlebot3_ros-3] [INFO] [1738299487.844016446] [turtlebot3_node]: Succeeded to create joint state publisher
[turtlebot3_ros-3] [INFO] [1738299487.844149094] [turtlebot3_node]: Add Devices
[turtlebot3_ros-3] [INFO] [1738299487.844204353] [turtlebot3_node]: Succeeded to create motor power server
[turtlebot3_ros-3] [INFO] [1738299487.849349150] [turtlebot3_node]: Succeeded to create reset server
[turtlebot3_ros-3] [INFO] [1738299487.851512798] [turtlebot3_node]: Succeeded to create sound server
[turtlebot3_ros-3] [INFO] [1738299487.853739761] [turtlebot3_node]: Run!
[turtlebot3_ros-3] [INFO] [1738299487.890749557] [diff_drive_controller]: Init Odometry
[turtlebot3_ros-3] [INFO] [1738299487.909780816] [diff_drive_controller]: Run!
We will delve deeper into launch files in future lessons, but for now, understand that a launch file is used to initiate one or more ROS nodes.
Your Turtlebot3 is now ready to drive and should be listening for Twist messages sent over the /cmd_vel topic.
Verify Turtlebot3’s Communication with the Master:
It’s always a good idea to check that the Turtlebot3 is communicating with the Master. To do this, list the active topics that the Turtlebot3 is publishing. Run the following command on your Master:
$ ros2 topic list
If everything is working correctly, you should see something like this:
/battery_state
/cmd_vel
/imu
/joint_states
/magnetic_field
/odom
/tf_static
Observe the Nodes Running on the Master:
Open a new terminal on the Master and run the following command to observe the currently running nodes:
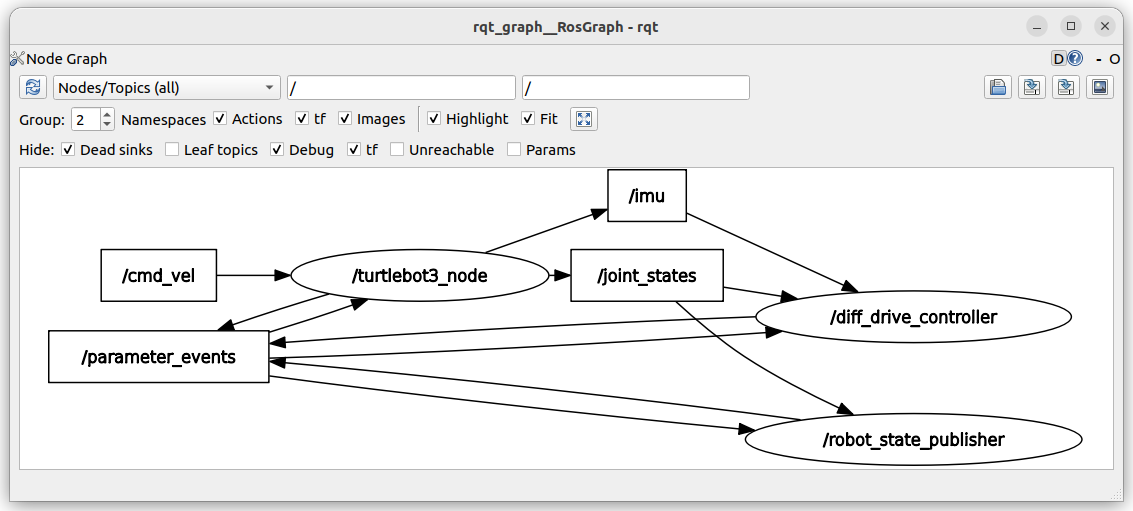
$ rqt_graphAs shown on the figure below, you should see
/turtlebot3_nodesubscribing to the /cmd_vel topic and publishing multiple topics including /imu.
Get Information About
/turtlebot3_node:Open another terminal and run the following command to get information about the
/turtlebot3_node:
$ ros2 node info /turtlebot13_node
This will show the topics
/turtlebot3_nodeis publishing and subscribing to.
Review the /cmd_vel Topic:
We used the /cmd_vel topic when driving the simulated Turtlebot3. To refresh our memory, let’s check the topic information:
$ ros2 topic info /cmd_vel
This shows that the /cmd_vel topic uses the Twist message type. We can verify this by running:
$ ros2 topic type /cmd_vel
Show Information About the Twist Message:
To see information about the fields within the Twist message sent over the /cmd_vel topic, run the following command:
$ ros2 interface show geometry_msg/msg/Twist
Run the
teleop_keyboardNode on the Master:Open a terminal on the Master and run the following command:
$ ros2 run turtlebot3_teleop te1eop_keyboard
Warning
If you run
ros2 run teleop_twist_keyboard teleop_twist_keyboard, the minimum linear x speed of thecmd_velpublished by theteleop_twist_keyboardnode is 0.5 m/s, which is greater than the maximum speed of TurtleBot3, so TurtleBot3 will ignore the topic.Drive the TurtleBot3:
Use arrow keys to navigate.
Adjust linear velocity (0.1-0.2 m/s) and angular velocity (0.5-1.5 rad/s) for best control.
Operate Turtlebot3 with Optimal Parameters:
The Turtlebot3 operates best with a linear velocity between 0.1 m/s and 0.2 m/s. It turns best with an angular velocity between 0.5 rad/s and 1.5 rad/s. Use these parameters to drive the TurtleBot3 safely.
Observe Node Communication with
rqt_graph:Before driving the Turtlebot3, observe how the nodes communicate using the
rqt_graphtool. Open a new terminal (or refresh the existingrqt_graphwindow if it’s still open) to see the interactions.
Driving the Robot with Gamepad#
Stop the current node: Go to the terminal running the
teleop_keyboardnode and stop it by pressingCtrl+C.Run the
gamepadnode: Execute thegamepadnode that you developed in the previous lab.Run the
joynode: Start thejoynode.Adjust angular speed: If the angular speed is too fast, modify your code so that the joystick range (-1 to 1) corresponds to a smaller range of angular speed.
Demonstrate movement: Show that the robot can move on the floor using the gamepad.
Capture screenshot: Capture a screenshot of
rqt_graph.
🚚 Deliverables#
Demonstrate that you can successfully drive the TurtleBot3 using gamepad teleoperation.
Submit the screenshot of
rqt_graphon Gradescope.Push your code.