
🔬 Lab11: AprilTag#
📌 Objectives#
Students should be able to explain the purpose of fiducial markers in robotics.
Students should be able to calibrate a USB camera using ROS2 tools and a checkerboard pattern.
Students should be able to explain and interpret ROS2 camera calibration messages.
Students should be able to set up and run a ROS2 node for AprilTag detection.
Students should be able to interpret position and orientation data from detected AprilTags.
Students should be able to demonstrate the ability to use AprilTag data for estimating distance to objects.
📜 Overview#
This lab introduces the use of fiducial markers—specifically AprilTags—for robot perception and navigation. These markers are used in robotics for tasks like localization, mapping, and interaction with known objects. AprilTags are square, black-and-white markers that encode an ID in a unique pattern, allowing them to be recognized by a vision system.
We’ll use ROS2 tools and a camera to detect AprilTags in the environment. The camera will provide images to a detection node, which will process these images and estimate the 3D pose (position and orientation) of each tag relative to the camera. With this information, we can calculate the robot’s distance from the tag and understand its spatial relationship to the object.
Before detecting tags, we must first calibrate the USB camera to correct for lens distortion and establish a reliable relationship between image pixels and real-world measurements. Calibration ensures accurate position and distance calculations.
This lab will also help solidify your understanding of ROS2 topics, nodes, and message types—all critical for real-world robotic applications.
🛠️ Lab Procedures#
✅ Part 1: Calibrate the USB Camera#
For a camera to effectively perform computer vision tasks, it must first be calibrated. Without calibration, there’s no reliable reference for determining the size of objects within the camera’s frame. The ROS Calibration Tool generates a calibration file that other ROS packages can use to calculate object size and distance. The camera_calibration package leverages OpenCV’s calibration techniques to simplify the process of calibrating monocular or stereo cameras, typically using a checkerboard pattern as the target. For detailed instructions, refer to the Camera Calibration Tutorial.
Disconnect the camera from the robot and plug it into the Master computer. Then run:
ros2 run usb_cam usb_cam_node_exe --ros-args -p video_device:=/dev/video0
Check if topics are being published:
ros2 topic list
Make sure you see
/image_rawand/camera_info. Then check the message type:ros2 topic type /camera_info ros2 interface show <message>
Echo the camera info:
ros2 topic echo /camera_info
Look for values under
K,R, andP. Initially, they’ll be all zeros—this means the camera is not yet calibrated.💡 You should be comfortable using these ROS2 commands. Expect to answer related questions during graded reviews (GRs).
Run the calibration tool. Use the checkerboard (9x6 internal corners, 2.5 cm spacing). Run:
ros2 run camera_calibration cameracalibrator --size 9x6 --square 0.025 --camera_name default_cam --no-service-check --ros-args -r image:=/image_raw
This launches a calibration window.
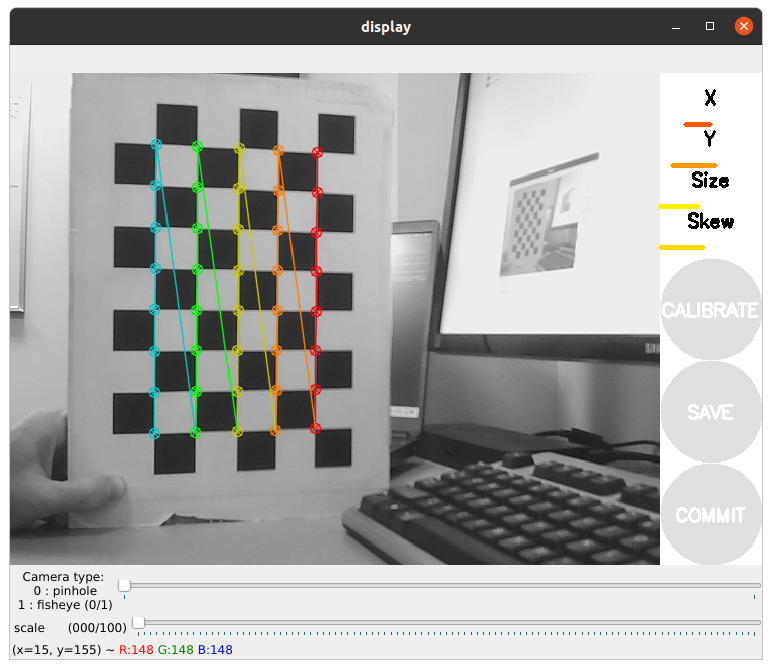
To collect calibration data, move the checkerboard in the camera view in various ways:
Left/right/top/bottom
Closer/farther
Tilted at angles
Fill the entire frame
Four progress bars will fill up. When the “CALIBRATE” button activates, click it.
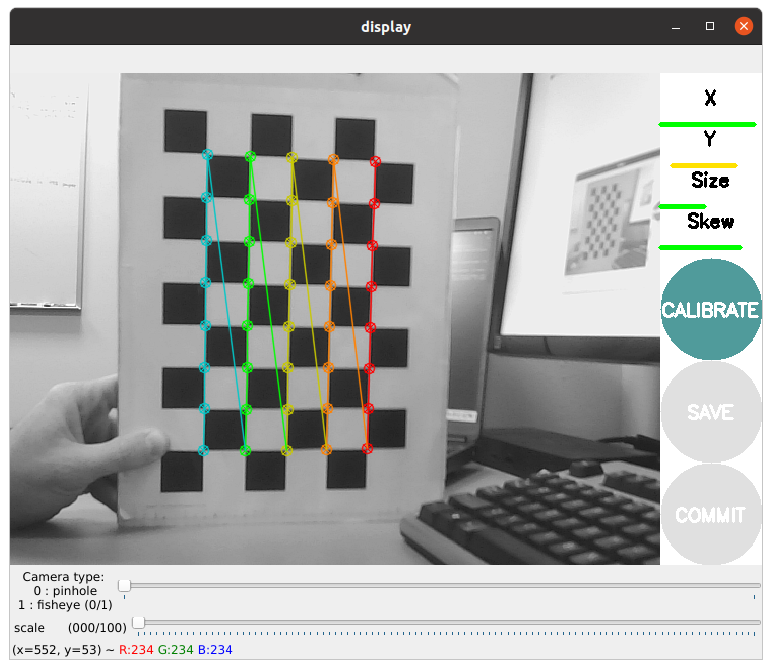
🕓 Calibration may take a few minutes. The windows might be greyed out but just wait, it is working.
When complete, it will display something similar to the following output:
**** Calibrating ****
mono pinhole calibration...
D = [-0.027598200869062808, -0.0273210932029884, 0.002259050714452529, 0.004238057516107571, 0.0]
K = [517.6781776101559, 0.0, 330.5433124974498, 0.0, 522.269778659698, 247.60730067305022, 0.0, 0.0, 1.0]
R = [1.0, 0.0, 0.0, 0.0, 1.0, 0.0, 0.0, 0.0, 1.0]
P = [508.604248046875, 0.0, 333.1752989083179, 0.0, 0.0, 517.5308227539062, 248.01611962861898, 0.0, 0.0, 0.0, 1.0, 0.0]
None
# oST version 5.0 parameters


[image]

width
640

height
480

[default_cam]

camera matrix
517.678178 0.000000 330.543312
0.000000 522.269779 247.607301
0.000000 0.000000 1.000000

distortion
-0.027598 -0.027321 0.002259 0.004238 0.000000

rectification
1.000000 0.000000 0.000000
0.000000 1.000000 0.000000
0.000000 0.000000 1.000000

projection
508.604248 0.000000 333.175299 0.000000
0.000000 517.530823 248.016120 0.000000
0.000000 0.000000 1.000000 0.000000
Save and extract calibration data. Click Save, then Commit. Browse to the location of the calibration data and extract
cd /tmp
tar xf calibrationdata.tar.gz
Move the
ost.yamlfile to the correct ROS folder with a new name,default_cam.yaml:cd ~/.ros mkdir camera_info mv /tmp/ost.yaml ./camera_info/default_cam.yaml
Relaunch the camera node:
ros2 run usb_cam usb_cam_node_exe --ros-args -p video_device:=/dev/video0
Take another look at the
camera_infotopic. Do you notice any differences compared to the message published by theusb_camnode when calibration data is not included? Keep in mind that theusb_camnode does not use theCameraInfomessage to produce rectified images from the raw data (\image_raw). Instead, it publishes theCameraInfomessage so that you can use it to create rectified images if needed.Take a screenshot of the calibrated
camera_infooutput. This is one of your deliverables.
✅ Part 2: AprilTag Detection with ROS2#
In this section, you will explore how to detect AprilTags in ROS 2. There are several methods to achieve this, one of which involves using multiple existing ROS nodes and connecting them via ROS topics. While this approach may seem straightforward, managing the interactions between different nodes can become complex and inefficient. To simplify this process, we will develop our own custom node to handle all the required functionality.
Create a package named
lab11_apriltagwith the dependencies:
rclpycv_bridgesensor_msgsstd_msgsopencv2
Download the provided
apriltag.pyand place it in your package’s scripts directory.Update your
setup.pyto include the script as an entry point. This is necessary to ensure that the script runs as a node.Inside your package (not the scripts folder), create a new directory called
config. Next, copy thedefault_cam.yamlfile into this directory. The code inapriltag.pyis already set up to load this default calibration file if no calibration file path is provided by the user when the node is executed. Your directory structure should look like this:lab11_apriltag/ ├── config/ │ └── default_cam.yaml ├── lab11_apriltag/ ├── resources/ └── ...
Add this path to your
setup.pyunderdata_files:data_files=[ ('share/' + package_name + '/config', ['config/default_cam.yaml']), ... ]
And in
package.xml, include:<buildtool_depend>ament_cmake</buildtool_depend> <exec_depend>ament_index_python</exec_depend>
Open the
apriltag.pyscript and examine the constructor to understand how it handles loading files via command line arguments. If no argument is provided, it defaults to a pre-configured file. Pay close attention to theload_camera_infomethod—it demonstrates how to extract data from ayamlfile effectively. While the same functionality could be achieved by subscribing to thecamera_infotopic published by theusb_camnode, using a calibration file is more efficient since thecamera_infotopic repeatedly publishes identical data over time.Launch the
usb_camnode with a frame rate set to 15 Hz:ros2 run usb_cam usb_cam_node_exe --ros-args -p vidoe_device:=/dev/video0 -p framerate:=15.0
Start the
apriltag_rosnode to detect AprilTags.ros2 run lab11_apriltag apriltag_node --ros-args -p cammera_info_file:=~/.ros/camera_info/default_cam.yam1
Important
Carefully compare the way we pass the ROS2 arguments here with the way we did for
stop_detectorin Lab 10. If you read both scripts,apriltag.pyuses the ROS2 arguments andstop_detector.pyuses the Python arguments.Open another terminal and echo the topic
/apriltag_poseon the master. Observe the output. Does theapriltag_rosnode detect more than one tag simultaneously? Consider which value might be used to calculate the distance to a tag, and note the type of message being published. Identify the package this message originates from.Demonstrate to the instructor that the apriltag_ros node is successfully detecting tags and publishing their position data.
With a properly calibrated camera, you are now equipped to identify AprilTags along with their size, orientation, and distance.
✅ Part 3: Launch#
This section guides you through creating a launch file to run three key nodes: usb_cam, stop_detector, and apriltag_node, with the required parameters.
Revisit the
gamepad.launch.pyfile from Lab 8 (Using ROS2 Launch Files). This section provides only an overview, so ensure you thoroughly refresh your understanding of the launch file creation process before proceeding.Locate the
stop_detector.svmfile from Lab 10 and copy it to theconfigdirectory within thelab11_apriltagpackage. Then, update thesetup.pyscript by addingstop_detector.svmto thedata_filessection. This step ensures the file is appropriately packaged and accessible.Download the provided
vision.launch.pyand place it in the launch directory of thelab11_apriltagpackage.Edit this file as you did in Lab 8, ensuring you include all three nodes:
usb_cam,stop_detector, andapriltag_node.Ensure the necessary import statements and configuration setup:
from launch import LaunchDescription
from launch_ros.actions import Node
from ament_index_python.packages import get_package_share_directory
import os
Make sure the paths to important configuration files are correctly configured.
pkg_share = get_package_share_directory('lab11_apriltag')
config_dir = os.path.join(pkg_share, 'config')

stop_detector_model = os.path.join(config_dir, 'stop_detector.svm')
camera_info_path = os.path.join(config_dir, 'default_cam.yaml')
camera_info_url = 'file://' + camera_info_path
Ensure the nodes are properly configured with the required parameters. Use paths to the configuration files to make your launch file robust and dynamic.
Important
Do not copy code snippets verbatim without understanding their functionality. You will be required to answer related questions during GRs or assessments, so ensure your comprehension of each step and its purpose.
Add the launch file (
vision.launch.py) to thedata_filessection in thesetup.pyscript. This inclusion ensures the launch file is packaged correctly.Build and Test
Build your package to compile any changes made.
Execute the
vision.launch.pyfile. Verify that the nodes (usb_cam,stop_detector, andapriltag_node) launch successfully.Confirm detection functionality by observing the published topics and verifying that both stop signs and AprilTags are detected accurately.
🚚 Deliverables#
[15 Points] Complete the
apriltag.pyScriptImplement all required features to ensure the script is fully functional.
Push your code to GitHub and confirm that it has been successfully uploaded. NOTE: If the instructor can’t find your code in your repository, you will receive a grade of 0 for the coding part.
[10 Points] Submit Screenshots
Submit a screenshot of the
camera_infotopic.
[25 Points] Demonstration
Demonstrate simultaneous detection of multiple AprilTags (minimum of 2) and stop signs by running both
apriltag_rosandstop_detectornodes. Verify proper operation by showing that both nodes are publishing valid messages to their respective topics (/apriltag_poseand/stop_dist).